


I still remember the first time I stumbled upon the question, “What can I make with rising flour?” as I rummaged through my pantry on a lazy Sunday morning. I had a bag of self-raising flour waiting for its moment to shine, and that day, I decided to transform it into a batch of warm, buttery biscuits that filled my kitchen with an irresistible aroma. This recipe has become one of my absolute favorites, and today, I’m excited to share my ultimate self-raising flour biscuit recipe with you. Whether you’re a seasoned baker or just starting out, these biscuits are not only super simple to make but also incredibly versatile, allowing for plenty of creative twists and ingredient substitutions.
A Bit About Self-Raising Flour and Why I Love It
Before diving into the recipe, let me share why self-raising flour (often lovingly called “rising flour”) holds a special place in my heart and kitchen. Unlike plain flour, self-raising flour has baking powder already mixed in, giving your baked goods a delightful lift without the need for extra leavening agents. This means faster preparation and fewer steps in the kitchen—perfect for those busy mornings when you still want something homemade and heartwarming.
Fun Fact: If you ever run out of self-raising flour, you can easily make your own by combining 1 cup of plain flour with 1½ teaspoons of baking powder and a pinch of salt. This little trick has saved me more times than I can count!
For those curious to know more about the science behind rising flour, check out this Wikipedia article on self-raising flour for an in-depth explanation.
Ingredients & Substitutions
Essential Ingredients
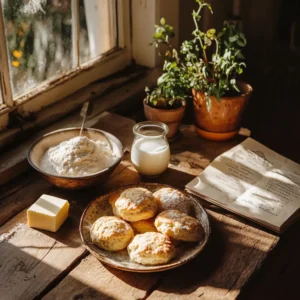
Here’s what you’ll need to make my delicious self-raising flour biscuits:
- 2 cups self-raising (rising) flour – The star ingredient!
- 1/2 teaspoon salt – Enhances all the flavors.
- 1/2 cup unsalted butter – Cold and cubed for a flaky texture.
- 3/4 cup milk – Use whole milk for richness.
- 1 tablespoon sugar – For a hint of sweetness.
Optional Add-Ins and Substitutions
I love experimenting with ingredients, and these biscuits are no exception. Feel free to try these variations:
- Herbs & Spices: Add 1 teaspoon of dried rosemary or thyme for a savory twist.
- Cheese: Stir in 1/2 cup grated cheddar cheese for extra indulgence.
- Dairy-Free Option: Use a plant-based butter substitute and almond or oat milk instead of dairy.
- Gluten-Free Version: Use a gluten-free self-raising flour blend (ensure it’s properly blended with a rising agent).
Pro Tip: Always ensure your butter is cold when cubed. It creates small pockets of steam during baking, resulting in those delightful, flaky layers.
Step-by-Step Biscuit Recipe
Let’s get into the heart of the recipe. I promise you, each step is filled with tips that I’ve picked up from years of baking and personal trial and error.
Step 1: Preheat and Prepare
-
Preheat Your Oven:
Preheat your oven to 425°F (220°C). A properly heated oven is crucial for the biscuits to rise beautifully. -
Prepare Your Baking Sheet:
Line a baking sheet with parchment paper or lightly grease it. This step ensures your biscuits don’t stick and makes for an easy clean-up later.
Step 2: Mixing the Dry Ingredients
-
Combine Flour and Salt:
In a large bowl, sift together 2 cups of self-raising (rising) flour and 1/2 teaspoon of salt. Sifting not only aerates the flour but also ensures that the salt and any other dry spices are evenly distributed. -
Incorporate the Sugar:
Add 1 tablespoon of sugar to the mix. While not essential, the sugar adds a subtle sweetness that balances the butter’s richness.
Step 3: Cutting in the Butter
-
Add the Butter:
Drop in 1/2 cup of cold, cubed unsalted butter into your dry mixture.My Tip: I always use a pastry cutter or my fingertips to gently rub the butter into the flour until the mixture resembles coarse crumbs. This technique is key to achieving that perfect flakiness.
-
Mix Until Crumbly:
Work quickly to avoid melting the butter. You want the butter to stay cold, creating those little pockets of goodness.
Step 4: Adding the Milk and Forming the Dough
-
Pour in the Milk:
Slowly add 3/4 cup of milk to the mixture. I prefer whole milk, but if you’re looking for a lighter biscuit, you can use 2% milk instead. -
Mix Gently:
Stir the mixture with a fork or a spatula until just combined. Overmixing can lead to tough biscuits—remember, we want light and airy! -
Form the Dough:
Once the dough starts coming together, turn it out onto a lightly floured surface. Gently knead it 3-4 times until it forms a cohesive ball. If the dough is too sticky, sprinkle a little more self-raising flour.
Step 5: Cutting and Baking
-
Roll and Cut:
Roll out the dough to about 1/2-inch thickness. Using a biscuit cutter or even a simple glass, cut out biscuits. I love using a round cutter because it gives each biscuit a consistent, classic look. -
Place on Baking Sheet:
Transfer the biscuits to your prepared baking sheet, leaving a little space between each to allow for expansion. -
Bake:
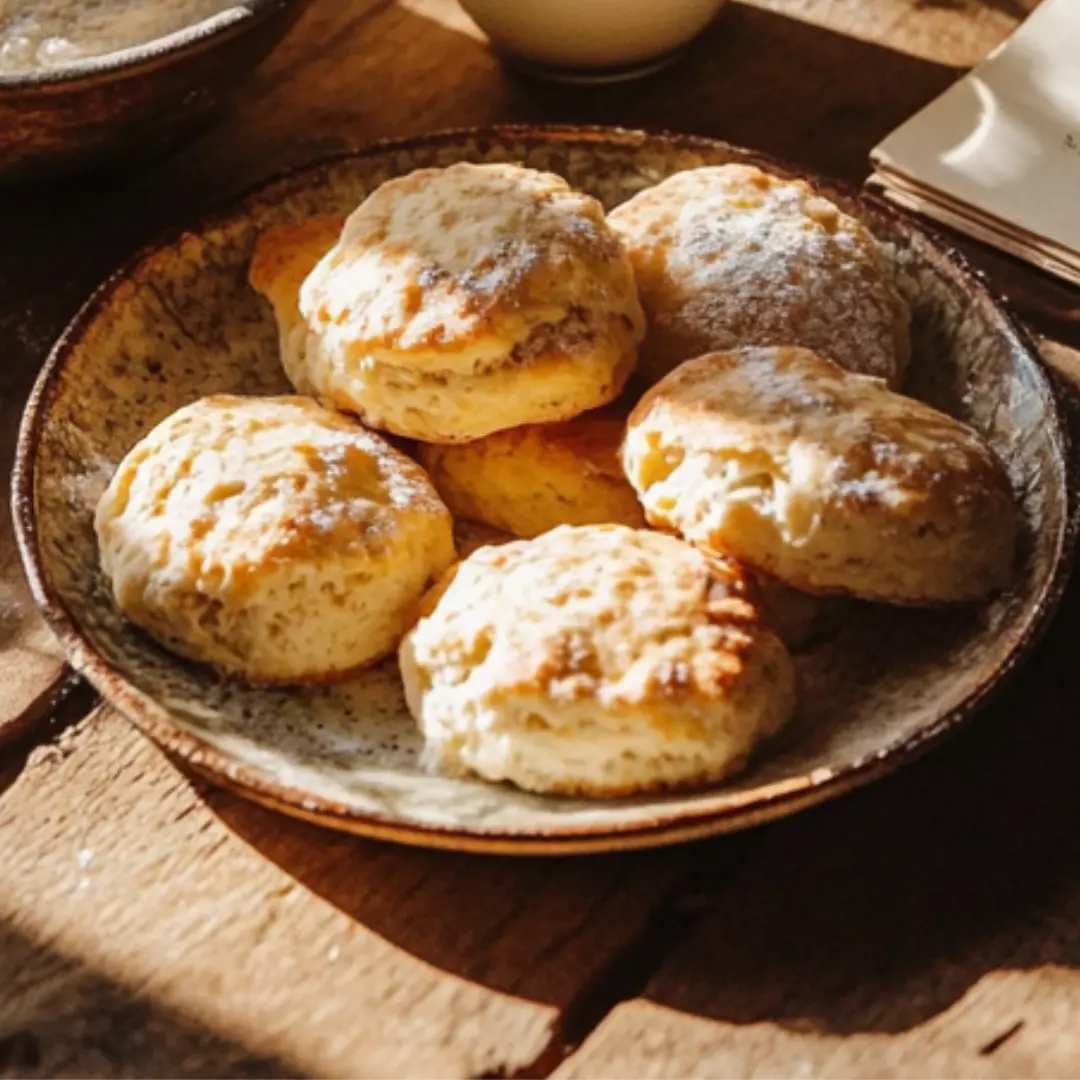
Pop the biscuits into the preheated oven and bake for 12-15 minutes, or until they are golden brown on top. -
Cool Slightly:
Remove the biscuits from the oven and let them cool on a rack for a few minutes. This cooling period lets the biscuits firm up, making them even more enjoyable to eat.
Cooking Tips & Techniques
I’ve learned a few things along the way that can make a big difference in your biscuit game. Here are some of my favorite tips:
-
Cold Ingredients Are Key:
Always use cold butter and milk. Warm ingredients can cause the butter to melt too quickly, resulting in a denser biscuit. -
Don’t Overwork the Dough:
Handling the dough too much can develop gluten, making your biscuits chewy instead of light and flaky. Mix until just combined. -
Even Baking:
Rotate your baking sheet halfway through baking if your oven tends to have hot spots. This ensures all biscuits bake evenly. -
Customization:
Experiment with mix-ins such as grated cheese, chopped herbs, or even bits of cooked bacon for a savory twist.
Serving Suggestions & Pairings
These biscuits are incredibly versatile, and I love serving them in different ways depending on the occasion:
-
Breakfast:
Enjoy them warm with a pat of butter and a drizzle of honey. They’re perfect alongside a cup of freshly brewed coffee. -
Lunch or Dinner:
Serve them as a side with soups, stews, or even a hearty chili. The biscuit’s soft, fluffy texture is the perfect complement to a rich, savory broth. -
Snack Time:
Use them as a base for mini sandwiches. Fill them with egg salad, chicken, or even a simple tomato and mozzarella combination.
For more creative serving ideas, check out some delicious sandwich recipes on Activity Recipes.
Storage & Reheating Tips
I always make sure to have a plan for any leftover biscuits (if there are any, that is!). Here’s how I store and reheat them:
-
Storage:
Allow the biscuits to cool completely, then store them in an airtight container at room temperature for up to 2 days. If you need them to last longer, place them in the refrigerator for up to 3 days. -
Freezing:
For longer storage, you can freeze the biscuits. Wrap each one individually in plastic wrap and place them in a freezer bag. They’ll keep well for up to 2 months. -
Reheating:
To reheat, pop them in a preheated 350°F (175°C) oven for about 5-7 minutes. Alternatively, microwave them for 15-20 seconds (depending on your microwave’s power). For best results, I recommend reheating in the oven to preserve their crisp edges.

Common Mistakes & Troubleshooting
Even the best cooks have faced challenges, and I’m no exception. Here are some common mistakes I’ve encountered (and overcome) when making these biscuits:
-
Overmixing the Dough:
This is the number one mistake. Overmixing leads to tough, dense biscuits. Always mix just until the ingredients are combined. -
Butter Too Warm:
If the butter melts into the dough, your biscuits won’t be flaky. I always double-check that my butter is chilled and only handle the dough as little as possible. -
Cutting the Dough Unevenly:
Using a sharp cutter and ensuring your dough is evenly rolled out makes a huge difference in consistency. I often use a biscuit cutter dipped in a little flour to prevent sticking. -
Oven Temperature Variations:
Not all ovens are created equal. If your biscuits aren’t rising as expected or are browning too quickly, invest in an oven thermometer to ensure accurate temperatures.
FAQs
Here are some frequently asked questions that might help you master this recipe even further:
Can I Make This Recipe Ahead of Time?
Yes! You can prepare the dough ahead and cut the biscuits right before baking. Alternatively, you can bake the biscuits and store them as mentioned in the storage section. Reheat just before serving for the best taste.
What Can I Make With Rising Flour Besides Biscuits?
Great question! Rising flour is extremely versatile. Besides biscuits, you can make:
- Pancakes
- Scones
- Quick breads
- Muffins
Experiment and see what creative dishes you can come up with!
Can I Substitute Milk for a Dairy-Free Version?
Absolutely. If you’re dairy-free, substitute with almond milk, soy milk, or oat milk. For the butter, use a dairy-free alternative or coconut oil (though this might slightly alter the flavor).
How Do I Make Self-Raising Flour at Home?
If you ever run out of self-raising flour, simply mix 1 cup of plain flour with 1½ teaspoons of baking powder and a pinch of salt. This quick fix works perfectly in a pinch.
Why Do My Biscuits Sometimes Turn Out Dense?
Dense biscuits are usually a result of overmixing or using ingredients that aren’t cold enough. Make sure to handle the dough gently and always use cold butter and milk.
Can I Add Flavorings or Extras to the Dough?
Yes! I love adding a pinch of garlic powder, dried herbs, or even grated cheese. Feel free to experiment until you find your perfect combination.
My Personal Journey with Rising Flour
I’ve always been fascinated by the simplicity and versatility of baking. I remember my grandmother’s kitchen filled with the smell of freshly baked bread and biscuits, and those memories inspired me to experiment with my own recipes. Every time I ask myself, “What can I make with rising flour?” I’m reminded of those cherished moments and the joy of sharing delicious food with family and friends.
Over the years, this biscuit recipe has evolved with small tweaks—a sprinkle of herbs here, a dash of cheese there—until it became the perfect blend of simplicity and flavor. I’ve shared it at brunches, family dinners, and even casual get-togethers, and it never fails to impress. The secret, I believe, lies in the quality of the ingredients and the love you put into every step of the process.
Tips for a Successful Baking Experience
Here are a few extra tips that I always follow to ensure my biscuits come out perfectly every time:
-
Plan Ahead:
Before you start, gather all your ingredients and equipment. This minimizes the chance of mistakes and helps keep the process smooth and enjoyable. -
Experiment with Fillings:
Try slicing open a warm biscuit and adding a dollop of jam, whipped cream, or even a fried egg for a quick and satisfying snack. -
Share the Love:
Baking is always more fun when shared. Invite a friend or family member to join you in the kitchen. Not only does it make the process more enjoyable, but it can also lead to new variations on the classic recipe.
For more engaging baking tips and creative recipes, visit Activity Recipes.
External Resources for Baking Inspiration
If you’re looking for further inspiration or want to dive deeper into the science of baking, here are a few authoritative sources I frequently consult:
- BBC Good Food – A treasure trove of recipes and cooking tips.
- Serious Eats – For detailed explanations and experiments with various baking techniques.
- The Kitchn – An excellent source for kitchen tips, tricks, and inspiring recipes.
Final Thoughts & Call to Action
Every time I whip up a batch of these self-raising flour biscuits, I’m reminded of the simple pleasures in life. The question “What can I make with rising flour?” now has a delightful answer—one that brings comfort, warmth, and a touch of nostalgia to every bite. Whether you’re a seasoned baker or just starting to explore the world of home cooking, I invite you to try this recipe and share your own twists and variations.
I’d love to hear about your experiences! Have you tried adding your favorite herbs or a unique filling? Do you have any secret tips to share? Drop a comment below or share your creation on social media. Let’s keep the conversation going and inspire each other in the kitchen.
Remember, the beauty of cooking lies in its versatility. Use this recipe as a foundation and experiment with flavors, textures, and techniques. And if you’re ever in doubt, simply ask yourself, “What can I make with rising flour?”—and then let your culinary creativity take over!
Thank you for joining me on this baking adventure. If you enjoyed this recipe, please consider bookmarking it, sharing it with friends, and exploring more recipes on Activity Recipes. Happy baking, and may your biscuits always be perfectly flaky and delicious!
FAQ Recap
Q: Can I make this recipe ahead of time?
A: Yes, you can either prepare the dough ahead or bake the biscuits in advance and store them as described above.
Q: What can I make with rising flour besides biscuits?
A: Rising flour is great for pancakes, scones, muffins, and quick breads. The possibilities are endless!
Q: Can I substitute milk and butter for a dairy-free version?
A: Absolutely. Use your preferred dairy-free milk and butter substitutes to achieve a similar texture and flavor.
Q: How do I avoid dense biscuits?
A: Use cold ingredients and mix the dough just until combined. Overworking the dough will lead to toughness.
Q: Can I add extra flavorings to the dough?
A: Yes! Feel free to experiment with herbs, spices, cheese, or even bits of bacon for a savory kick.
I hope this detailed guide inspires you to explore the wonderful world of baking with rising flour. Every time you ask, “What can I make with rising flour?” remember that there’s a delightful answer waiting in the form of these irresistible biscuits. I can’t wait to hear your thoughts and see your creations. Let’s make something amazing together—happy baking!