


Ever since I was a child growing up in Winnipeg, I’ve been enchanted by the warmth and tradition that surrounds homemade recipes. What is homemade recipes and stories from Winnipeg and Beyond? For me, it’s about carrying on cherished traditions while adding my own modern twist. Today, I’m excited to share my personal journey and detailed recipe for making homemade pierogi—a dish that not only brings back memories of family gatherings but also connects me with my roots and inspires creative variations in my kitchen.
My Connection to Winnipeg and the Art of Homemade Cooking
I still remember sitting in my grandmother’s cozy kitchen in Winnipeg, watching as she rolled out dough with practiced ease. The aroma of freshly boiled pierogi and the sizzle of caramelized onions would fill the room, transporting me to a world where every bite told a story. It was in that kitchen that I learned what is homemade recipes and stories from Winnipeg and Beyond truly all about—honoring tradition, embracing simple ingredients, and enjoying the process of creating something with love.
Over the years, I’ve experimented with the classic pierogi recipe, adding my own twists and substitutions to suit my modern lifestyle. This dish has evolved from a humble family recipe into a culinary canvas that welcomes creativity. In today’s article, I’m thrilled to share my step-by-step guide on making these delightful dumplings, along with tips, ingredient substitutions, and even some common pitfalls to avoid.

Ingredients & Substitutions
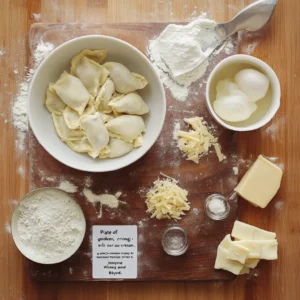
When making pierogi, the quality of your ingredients makes all the difference. Here’s the list of ingredients I use, along with some handy substitutions if you’re looking to tweak the recipe for dietary needs or simply to add a personal twist.
For the Dough
- 2 ½ cups all-purpose flour
Substitution: Use whole wheat or gluten-free flour blends if needed. - 1 teaspoon salt
- ½ cup warm water
Tip: Adjust water as needed to achieve a smooth dough. - 1 large egg
Substitution: For a vegan version, try 1 tablespoon of flaxseed meal mixed with 3 tablespoons of water. - 2 tablespoons melted butter
Substitution: Use olive oil or a dairy-free butter alternative.
For the Filling
- 3 large russet potatoes, peeled and cubed
Substitution: Sweet potatoes provide a sweeter twist. - 1 cup grated sharp cheddar cheese
Substitution: Try a mix of mozzarella and Parmesan for a different flavor profile. - 1 small onion, finely chopped
Tip: Caramelize the onion for extra sweetness. - Salt and pepper to taste
- Optional: 1/2 cup sauerkraut, drained and chopped
Tip: If you’re not a fan of sauerkraut, a handful of finely chopped spinach works beautifully.
Additional Components
- Sour cream, for serving
Substitution: Greek yogurt or a dairy-free alternative. - Caramelized onions and crispy bacon bits, for garnish
Fun Fact: I often experiment with adding sautéed mushrooms or even a pinch of smoked paprika into my filling to create a unique fusion that still honors the traditional taste of Winnipeg’s comfort food.
For more recipe inspiration, check out our collection of delicious homemade recipes that celebrate culinary traditions and modern creativity.
Step-by-Step Instructions
Creating the perfect pierogi is a labor of love that requires a bit of patience and lots of passion. Follow these detailed steps to achieve pierogi perfection.
Preparing the Dough
Mixing and Kneading
-
Combine the Dry Ingredients:
In a large bowl, mix 2 ½ cups of flour and 1 teaspoon of salt. I always like to sift the flour for a lighter texture. -
Incorporate the Wet Ingredients:
Make a well in the center and add the warm water, egg, and melted butter. Using your hands or a wooden spoon, mix until the dough starts coming together.
Pro Tip: If the dough is too sticky, sprinkle in a little more flour. If it feels dry, add a splash more water. -
Kneading:
Turn the dough out onto a lightly floured surface and knead for about 5-7 minutes until it’s smooth and elastic.
Personal Note: I find that kneading the dough helps me connect with the recipe. It’s almost meditative—reminding me of the times I spent with my grandmother. -
Resting the Dough:
Cover the dough with a clean towel or plastic wrap and let it rest for at least 30 minutes. This rest period is crucial as it allows the gluten to relax, making the dough easier to roll out.
Making the Filling
Potato and Cheese Filling
-
Boil the Potatoes:
Place the cubed potatoes in a large pot, cover them with cold water, and bring to a boil. Cook until they’re tender (about 15-20 minutes). Drain the potatoes well. -
Mash and Mix:
In a large bowl, mash the potatoes until smooth. Stir in the grated cheddar cheese and finely chopped onions.
Pro Tip: For a creamier texture, add a small knob of butter or a drizzle of olive oil. Season with salt and pepper to taste. -
Optional Sauerkraut:
If you’re adding sauerkraut, gently fold it into the mixture. This step adds a tangy depth of flavor that pairs beautifully with the creamy filling.
Assembling the Pierogi
Rolling and Filling
-
Roll Out the Dough:
On a lightly floured surface, roll out the dough to about 1/8-inch thickness. I prefer using a rolling pin, ensuring the dough is even throughout. -
Cutting the Circles:
Use a round cutter (about 3 inches in diameter) to cut circles from the dough. If you don’t have a cutter, a glass rim works perfectly. -
Fill and Fold:
Place a spoonful of the potato and cheese filling onto the center of each circle. Be careful not to overfill as it might cause the pierogi to burst during cooking.- Folding: Gently fold the dough over the filling to form a half-moon shape.
- Sealing: Press the edges firmly with your fingers or a fork to seal them completely.
Tip: A well-sealed pierogi ensures that the filling stays intact during cooking.
Cooking the Pierogi
Boiling and Sautéing
-
Boiling:
Bring a large pot of salted water to a boil. Drop in the pierogi in batches. When they float to the surface (usually in about 3-4 minutes), they’re done. Use a slotted spoon to remove them.- Important: Don’t overcrowd the pot; give each pierogi enough space to cook evenly.
-
Sautéing:
For an extra layer of flavor, heat a pan with a tablespoon of butter or oil. Sauté the boiled pierogi for 2-3 minutes on each side until they get a light golden crust.- Personal Touch: I love the extra texture and flavor that sautéing gives—each crispy edge reminds me of the care put into every homemade meal.
-
Serving:
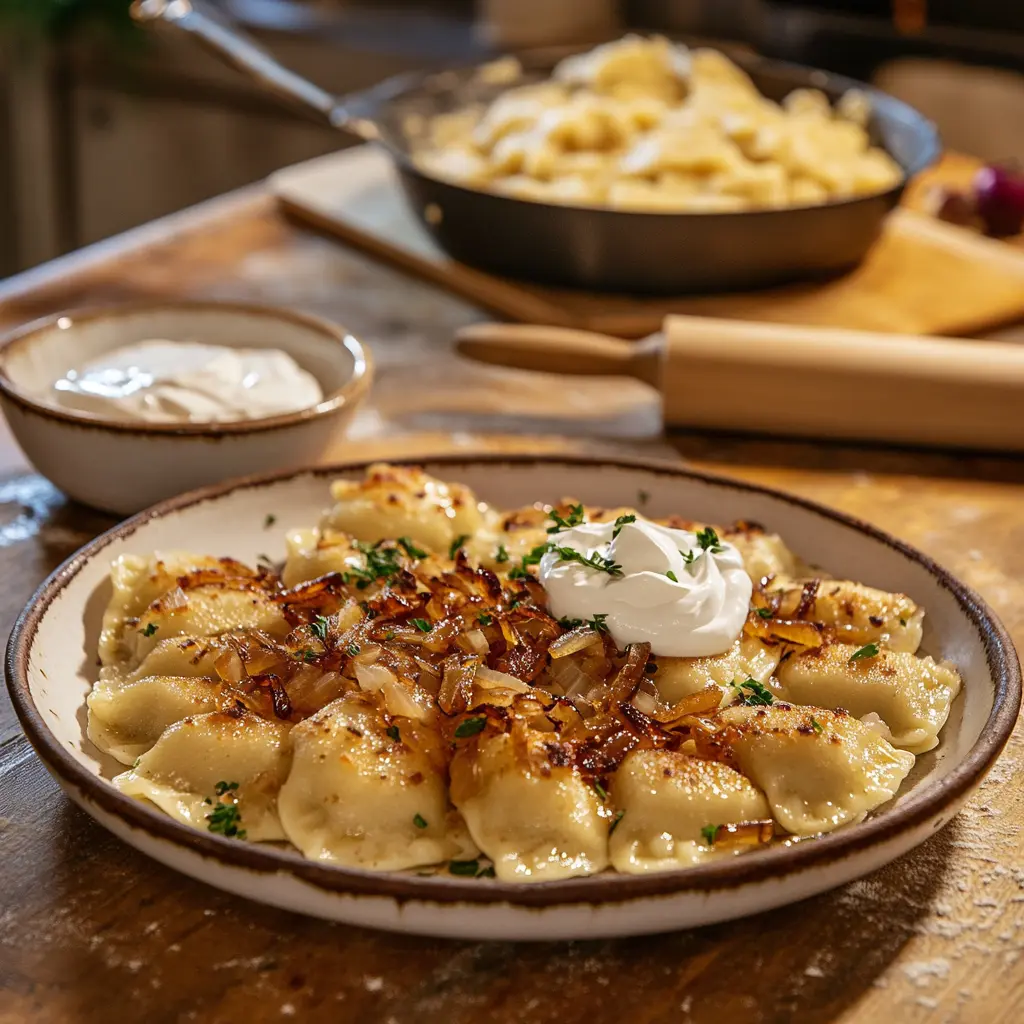
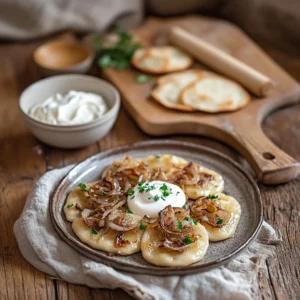
Serve the pierogi hot, topped with a generous dollop of sour cream and garnished with caramelized onions or crispy bacon bits.
Image Alt Text: “Plate of golden, crispy pierogi with sour cream—a perfect example of homemade recipes and stories from Winnipeg and Beyond.”
For further reading on the cultural significance of pierogi, consider visiting this BBC Food article that delves into the history of this beloved dish.
Serving Suggestions & Pairings
Pierogi is a versatile dish that can be enjoyed in many ways. Here are some of my favorite serving suggestions:
-
With a Side Salad:
A fresh, tangy salad with a light vinaigrette perfectly complements the rich flavors of pierogi. -
With Roasted Vegetables:
Try pairing pierogi with roasted carrots, Brussels sprouts, or even a medley of seasonal vegetables for a hearty meal. -
As a Snack or Appetizer:
Serve smaller pierogi with a dipping sauce—such as a garlic-infused sour cream—for a delightful finger food option. -
Drinks Pairing:
I often enjoy my homemade pierogi with a chilled glass of white wine or a crisp cider to balance the creamy filling.
Bold Tip: Experiment with your garnishes! A sprinkle of fresh dill or chives can add a burst of freshness to your plate.
For more innovative pairing ideas and recipe twists, visit our homemade recipe collection where I share even more delicious creations inspired by Winnipeg and beyond.
Storage & Reheating Tips
Even though pierogi is best enjoyed fresh, you might find yourself with leftovers. Here are some simple tips on how to store and reheat them without losing their charm:
-
Refrigeration:
Store any leftover pierogi in an airtight container in the refrigerator for up to 3 days. -
Freezing:
To freeze, arrange the pierogi on a baking sheet in a single layer and freeze until solid. Then, transfer them to a freezer-safe container or bag. They can be stored for up to 2 months. -
Reheating:
Reheat in a skillet over medium heat with a little butter or oil until they’re warmed through and slightly crispy. Alternatively, you can steam them for a softer texture.
Pro Tip: Avoid using a microwave if you want to preserve the crispy edges of your sautéed pierogi.
Common Mistakes & Troubleshooting
Even seasoned home cooks can run into hiccups. Here are some common issues and how to fix them:
-
Overfilling the Dough:
If you fill the pierogi too generously, they might burst while cooking. Use just enough filling to ensure a balanced taste and easier sealing. -
Under-Sealing:
Make sure the edges are well-pressed together. Gaps can lead to leaking filling during boiling. -
Dough Too Tough:
Overworking the dough can make it tough. Allow it to rest properly and avoid excessive kneading beyond the recommended time. -
Uneven Cooking:
Don’t overcrowd your boiling pot. Each pierogi needs enough space to cook evenly and float to the top.
By keeping these tips in mind, you can overcome common pitfalls and enjoy a perfectly made batch every time.
Frequently Asked Questions (FAQs)
Q: Can I make this recipe ahead of time?
A: Absolutely! You can prepare the dough and filling a day in advance. Assemble the pierogi and freeze them before boiling. When you’re ready, simply boil and sauté them as directed.
Q: Can I freeze pierogi?
A: Yes, you can. After assembling, place the pierogi on a baking sheet in a single layer and freeze. Once frozen, transfer them to a freezer-safe bag. They’ll keep well for up to 2 months.
Q: What are some ingredient substitutions I can try?
A: For the dough, experiment with whole wheat or gluten-free flour blends. For the filling, swap out cheddar for mozzarella or mix in some sautéed mushrooms for an extra burst of flavor. Vegan options are available by using flaxseed as an egg substitute and dairy-free butter alternatives.
Q: Can I make a vegan version of this recipe?
A: Definitely. Replace the egg with a flax egg (1 tablespoon flaxseed meal mixed with 3 tablespoons water) and use a dairy-free butter or oil. The filling can be enhanced with vegan cheese or nutritional yeast for a cheesy flavor without dairy.
Q: How do I store leftovers?
A: Leftovers can be refrigerated in an airtight container for up to 3 days. For longer storage, freeze them as described above, and reheat using a skillet for best results.
Final Thoughts & Call to Action
This recipe isn’t just about cooking—it’s a journey that connects me to my roots and the cherished homemade recipes and stories from Winnipeg and Beyond. Every pierogi I make carries a bit of nostalgia, a hint of modern flair, and a whole lot of love. Whether you’re an experienced home cook or just starting your culinary adventure, I hope this detailed guide inspires you to try your hand at making these delicious dumplings.
Cooking is all about experimentation, tradition, and sharing stories. I invite you to try this recipe, tweak it to your taste, and make it your own. Share your experiences, variations, or even any challenges you faced while making pierogi. Your feedback and stories can help create a vibrant community of home cooks who celebrate the art of making meals from scratch.
Remember:
- Embrace creativity in your kitchen.
- Don’t be afraid to try new substitutions and techniques.
- And most importantly, enjoy the process as much as the end result.
For more engaging recipes and personal cooking stories, visit our Activity Recipes collection, where I share more dishes that have shaped my culinary journey. You might also find inspiration in other recipes that have a similar comforting, homemade charm.
Additional Cooking Tips
-
Experiment with Fillings:
Try a blend of mashed sweet potatoes, kale, or even a savory meat filling for a diverse twist on the traditional recipe. -
Presentation is Key:
Garnish your finished dish with fresh herbs, a drizzle of chili oil, or a sprinkle of paprika for an extra burst of color and flavor. -
Cooking Together:
Invite family or friends to join in the process. Making pierogi can be a fun group activity that turns cooking into a memorable event. -
Learning from Mistakes:
Each batch teaches you something new. Whether it’s perfecting the dough’s texture or mastering the art of sealing, every attempt brings you closer to culinary perfection.
External Resources
For additional insights on traditional pierogi and its history, I recommend checking out this insightful BBC Food feature that explores the roots and variations of this beloved dish. It’s always fascinating to see how recipes evolve over generations and across continents.
In Conclusion
What is homemade recipes and stories from Winnipeg and Beyond? It’s about carrying forward a legacy of culinary traditions while infusing them with our unique personalities and experiences. Making homemade pierogi isn’t just a recipe—it’s a celebration of culture, creativity, and the joy of sharing good food with great company.
I hope you enjoyed reading about my journey with this classic dish and found the step-by-step instructions and tips helpful. Now it’s your turn! Dust off your rolling pin, gather your favorite ingredients, and create a batch of pierogi that tells your own story. I’d love to hear about your experiences—leave a comment below, share your twists on the recipe, or even post a photo of your final creation.
Happy cooking, and may your kitchen always be filled with love, laughter, and delightful aromas!
Call to Action:
If you tried this recipe, please share your story with me on social media or leave a comment below. For more inspiring homemade recipes and culinary adventures, subscribe to our newsletter and visit Activity Recipes. Let’s keep the spirit of homemade recipes and stories from Winnipeg and Beyond alive—together!