


I still vividly remember the first time I baked buttermilk biscuits in my tiny kitchen. I was curious about what is self rising flour in Canada?—a question that led me down a rabbit hole of ingredient research and experimentation. As a passionate home cook, I wanted to create a recipe that was both comforting and practical. In this article, I’m excited to share my detailed, step-by-step guide to making the fluffiest, most delicious homemade buttermilk biscuits. I’ll walk you through everything—from understanding self rising flour to pro tips on ingredient substitutions and troubleshooting common mistakes. Grab your apron, and let’s get baking!
My Personal Journey with Biscuits
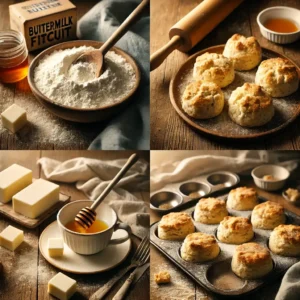
Growing up, biscuits were more than just food; they were memories of lazy weekend breakfasts and warm family gatherings. My love for baking deepened after I learned about the wonders of self rising flour—a pantry staple that simplifies the baking process. I often get asked, “What is self rising flour in Canada?” because the ingredient can be a bit confusing depending on where you live. In Canada, self rising flour is typically all-purpose flour that has been pre-mixed with leavening agents and salt, making it a convenient shortcut for making biscuits, pancakes, and other baked goods.
Understanding Self Rising Flour in Canada
Before we dive into the recipe, let’s clarify the primary ingredient that makes these biscuits so special. What is self rising flour in Canada? In essence, it’s all-purpose flour combined with a precise balance of baking powder and salt. This means you can skip the step of adding separate leavening agents to your dough, ensuring your biscuits rise perfectly every time.
- Benefits:
- Convenience: Fewer ingredients to measure.
- Consistency: Ensures even distribution of leavening agents.
- Time-saving: Streamlines the baking process.
For more in-depth details about self rising flour, you might find this The Kitchn article insightful.
Ingredients & Ingredient Substitutions
Creating the perfect biscuit starts with quality ingredients. Here’s my tried-and-tested list for a batch of homemade buttermilk biscuits. I’ve also included ingredient substitutions in case you need to adjust the recipe based on what you have at home.
Essential Ingredients
- Self Rising Flour: 2 cups (if you’re wondering what is self rising flour in Canada?, this is the ingredient pre-mixed with leavening agents and salt)
- Unsalted Butter: 1/2 cup (cold and cubed)
- Buttermilk: 3/4 cup (chilled)
- Optional: A pinch of sugar (for a slight sweetness)
Tip: For best results, use high-quality self rising flour. Look for Canadian brands that specify their blend if you’re shopping locally.
Ingredient Substitutions
- Butter Alternatives:
- Margarine or Vegan Butter: Substitute equal amounts for a dairy-free option.
- Coconut Oil: Use solid coconut oil in equal measure, though this may impart a slight coconut flavor.
- Buttermilk Alternatives:
- Milk and Vinegar: Mix 3/4 cup of milk with 1 tablespoon of vinegar; let sit for 5 minutes.
- Yogurt: Thin plain yogurt with a little water if you prefer a tangier flavor.
- Self Rising Flour Alternative:
- DIY Self Rising Flour: Combine 2 cups of all-purpose flour, 1 tablespoon of baking powder, and 1/2 teaspoon of salt.
Using substitutions is a great way to tweak the recipe to your dietary needs or available ingredients. I’ve experimented with these variations over the years and found that while the texture may vary slightly, the biscuits still come out beautifully.
Step-by-Step Instructions
Baking these biscuits is straightforward. Follow these detailed steps for a successful bake every time. I promise that with a little practice, you’ll be serving warm biscuits in no time!
Step 1: Preheat and Prepare
- Preheat your oven to 450°F (230°C).
- Prepare your baking sheet: Line it with parchment paper for easy cleanup.
- Chill your ingredients: Make sure your butter and buttermilk are cold. Cold ingredients help create that light, flaky texture.
Step 2: Combine Dry Ingredients
- Sift the self rising flour into a large bowl.
- Why sift? Sifting aerates the flour and ensures an even distribution of the pre-mixed leavening agents.
- Optional: Add a pinch of sugar to the flour for a subtle sweetness.
Step 3: Cut in the Butter
- Add the cold, cubed butter to the flour.
- Use a pastry cutter or your fingertips to work the butter into the flour until the mixture resembles coarse crumbs.
Pro Tip: Work quickly to avoid warming the butter; cold butter is key for flakiness.
Step 4: Incorporate the Buttermilk
- Make a well in the center of the dry ingredients.
- Pour in the chilled buttermilk slowly.
- Gently mix: Use a wooden spoon or spatula, stirring just until the dough comes together. Do not overmix!
- Hint: A slightly shaggy, sticky dough is ideal. Overworking can lead to tough biscuits.
Step 5: Shape the Biscuits
- Turn the dough onto a lightly floured surface.
- Gently knead: Pat the dough into a 1-inch thick rectangle. Avoid heavy kneading.
- Cut into shapes: Use a round biscuit cutter (or even a glass) dipped in flour to cut out biscuits.
- Alternative: If you prefer a rustic look, you can simply cut the dough into squares using a knife.
Step 6: Bake to Perfection
- Arrange the biscuits on the prepared baking sheet, ensuring they’re spaced slightly apart.
- Bake for 10-12 minutes: The biscuits should rise and turn a light golden brown.
- Optional: Brush the tops with melted butter for extra flavor and shine.
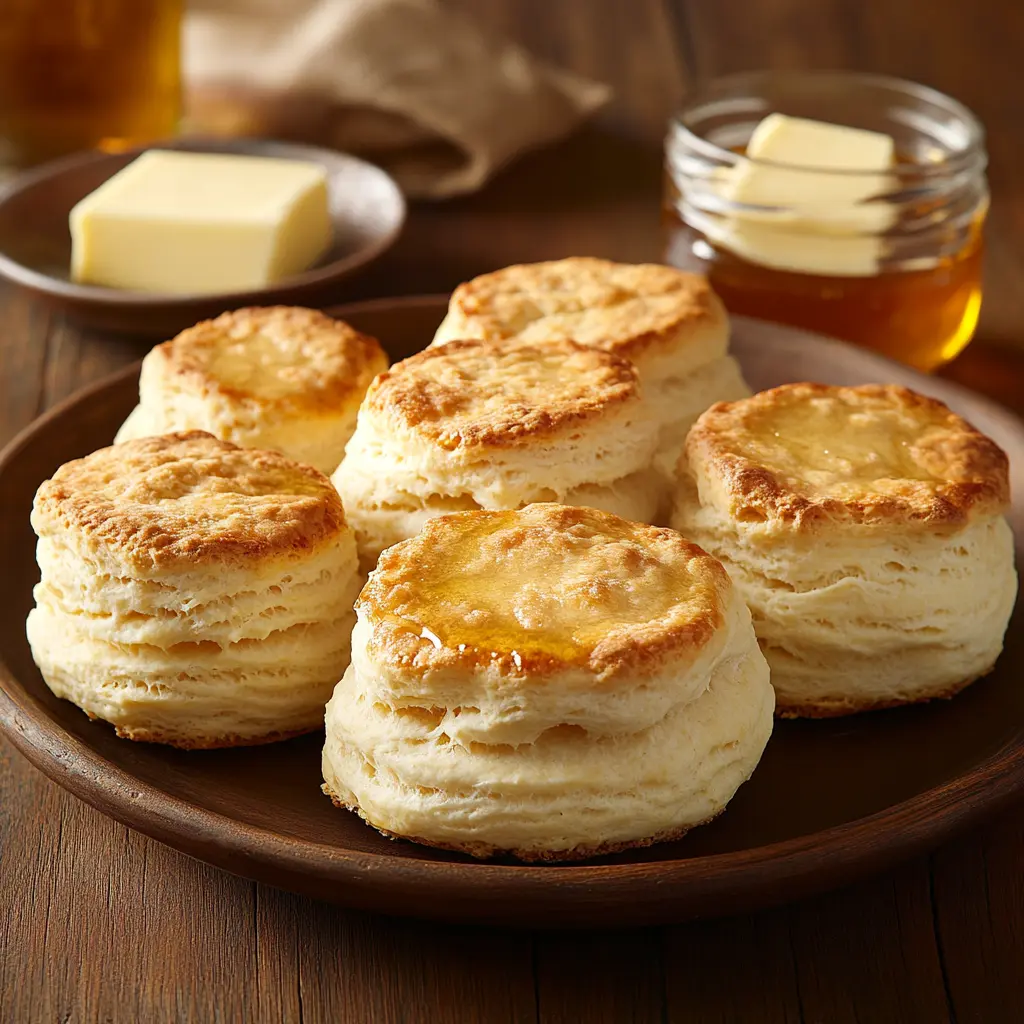
Step 7: Enjoy!
- Remove from the oven and serve immediately while still warm.
- Storage tip: Allow any leftovers to cool completely before storing in an airtight container.

Serving Suggestions & Pairings
These homemade buttermilk biscuits are incredibly versatile. I love pairing them with a variety of dishes and accompaniments that elevate the meal.
Perfect Pairings
- Breakfast: Serve with scrambled eggs, bacon, or a drizzle of maple syrup.
- Lunch/Dinner: Use as a side for hearty soups and stews, or transform them into a biscuit sandwich with fried chicken.
- Brunch: Top with jam, honey, or even a dollop of whipped cream for a sweet twist.
Beverage Pairings
- Coffee or Tea: A warm cup of coffee or herbal tea complements the savory flavors perfectly.
- Fresh Juice: A glass of fresh orange or apple juice adds a refreshing contrast.
- Milk: For kids (and the kid in all of us!), a cold glass of milk is always a hit.
Each serving suggestion brings out a unique element of the biscuit’s flavor, making it a versatile addition to any meal.
Storage & Reheating Tips
Sometimes you might have leftovers, or you may want to prepare a batch in advance. Here’s how to store and reheat your biscuits while preserving their fresh-from-the-oven goodness.
Storing Leftovers
- Room Temperature: Store in an airtight container for up to 1 day.
- Refrigeration: For longer storage, wrap the biscuits in foil or place them in a sealed container and refrigerate for up to 3 days.
- Freezing: Freeze in a single layer on a baking sheet. Once frozen, transfer to a freezer-safe bag for up to 1 month.
Reheating Methods
- Oven Reheating: Preheat your oven to 350°F (175°C). Place the biscuits on a baking sheet and warm for 5-7 minutes.
- Microwave: Wrap a biscuit in a damp paper towel and microwave on high for 15-20 seconds. Note that this may make them slightly softer.
- Toaster Oven: A quick reheat at 350°F (175°C) for 5 minutes works well for individual biscuits.
Reheating in the oven is my favorite, as it helps restore the crisp exterior and the warm, soft interior.
Common Mistakes & Troubleshooting
Even seasoned bakers encounter a few hiccups when making biscuits. Here are some common pitfalls and how to avoid them:
- Overworking the Dough:
- Issue: Overmixing can lead to tough, dense biscuits.
- Solution: Mix just until the dough comes together. A few lumps are perfectly fine.
- Using Warm Ingredients:
- Issue: Warm butter or buttermilk can prevent proper rising.
- Solution: Ensure all dairy is cold before use.
- Incorrect Oven Temperature:
- Issue: An oven that’s too cool may not allow the biscuits to rise properly, while one that’s too hot can burn them.
- Solution: Use an oven thermometer to verify the correct temperature.
- Improper Cutting Techniques:
- Issue: Rolling out the dough too thin or pressing down on the biscuits after cutting can deflate them.
- Solution: Pat the dough gently and use a light hand when handling biscuits.
Remember, every kitchen is different, and sometimes minor adjustments are necessary. Keep notes on what works best for you!
Cooking Tips & Ingredient Substitutions Recap
Here’s a quick recap of my favorite tips and ingredient substitutions to ensure your biscuits always turn out perfect:
- Use cold ingredients: This is key to a flaky texture.
- Mix minimally: Overworking the dough is the number one reason for dense biscuits.
- Substitutions:
- Butter: Can be replaced with margarine or coconut oil if needed.
- Buttermilk: Can be made from milk with vinegar, or even yogurt thinned out with water.
- Self Rising Flour: If unavailable, mix all-purpose flour with baking powder and salt.
- Baking Time: Keep a close eye on your biscuits in the oven to avoid overbaking.
By following these tips, you’ll gain the confidence to experiment with your own variations while still enjoying the classic taste of homemade buttermilk biscuits.
Frequently Asked Questions (FAQs)
Q1: What is self rising flour in Canada, and can I make it at home?
A: Self rising flour in Canada is essentially all-purpose flour combined with a measured amount of baking powder and salt. You can easily make your own by mixing 2 cups of all-purpose flour with 1 tablespoon of baking powder and 1/2 teaspoon of salt.
Q2: Can I make these biscuits ahead of time?
A: Yes! You can prepare the dough and even shape the biscuits ahead of time. Store them in the refrigerator for up to 24 hours. If you bake them later, add an extra minute or two in the oven to get that fresh, warm texture.
Q3: What if I don’t have buttermilk?
A: No worries! You can make a substitute by mixing 3/4 cup of milk with 1 tablespoon of white vinegar or lemon juice. Let the mixture sit for 5 minutes until it curdles slightly. Alternatively, thin plain yogurt with water can work as well.
Q4: How do I ensure my biscuits come out fluffy and not dense?
A: The key is to keep your ingredients cold and mix the dough just until it comes together. Overworking the dough can lead to tough biscuits. Using a light hand and a gentle folding technique will help maintain the airiness of the dough.
Q5: Can I add herbs or cheese to my biscuits?
A: Absolutely! Feel free to experiment by adding shredded cheese, chopped herbs (like rosemary or thyme), or even garlic powder into the dry ingredients before adding the buttermilk. Just remember that extra moisture or fat might slightly alter the texture, so adjust the recipe accordingly.
My Final Thoughts and Call to Action
Baking is both an art and a science, and every time I make these homemade buttermilk biscuits, I discover a new little detail that makes the recipe uniquely mine. Whether you’re a seasoned baker or just starting out, I hope this guide on what is self rising flour in Canada? and how to use it in my ultimate buttermilk biscuits recipe inspires you to experiment in your own kitchen.
The journey of creating a dish that brings warmth and comfort to your table is incredibly rewarding. I invite you to try out this recipe and tweak it to suit your taste. Don’t be afraid to experiment with ingredient substitutions or add your own twist with herbs, cheeses, or spices!
For more delicious recipes and kitchen tips, feel free to explore related recipes on Activity Recipes. I also recommend checking out this Food Network article for more baking inspiration and techniques.
Additional Tips for a Perfect Baking Experience
-
Plan Ahead:
- Read through the recipe before you start.
- Gather all ingredients and equipment in advance to ensure a smooth cooking process.
-
Experiment:
- Try adding different flavors—such as a dash of smoked paprika for a savory twist or a hint of cinnamon for a subtle sweetness.
-
Stay Organized:
- Clean as you go. This not only keeps your workspace tidy but also makes the cooking process less stressful.
-
Enjoy the Process:
- Baking is a journey. Even if your biscuits aren’t perfect on the first try, each attempt is a learning experience.
Remember, the most important part of cooking is to enjoy the process and share the results with loved ones. Whether you’re serving these biscuits for breakfast, lunch, or dinner, they’re sure to become a cherished favorite.
Exploring More Culinary Adventures
I’ve always believed that the best recipes come with a side of personal stories and heartfelt advice. From my early days experimenting with self rising flour in Canada to perfecting these light, fluffy biscuits, every mistake and success has taught me something new about the art of baking.
If you’re interested in other recipes that celebrate the joy of home cooking, check out our Homemade Pizza Dough Recipe and many more delightful ideas available on the website. Each recipe is crafted with care and a commitment to quality that I hope will inspire you to create amazing dishes in your own kitchen.
Wrapping Up
In summary, understanding what is self rising flour in Canada? can truly transform your baking experience. By using this pre-mixed flour, you save time without compromising on the quality and taste of your biscuits. I hope this comprehensive guide—from ingredients and substitutions to step-by-step instructions, serving suggestions, and troubleshooting tips—has given you the confidence to recreate these delicious buttermilk biscuits at home.
I’d love to hear your thoughts and any creative twists you add to this recipe. Have you tried making your own self rising flour substitute? What other ingredients have you experimented with in your biscuit recipes? Please leave a comment below or share your variations on social media. Your feedback not only inspires me but also helps build a community of passionate home cooks.
FAQs Recap
-
What is self rising flour in Canada?
It’s all-purpose flour pre-mixed with baking powder and salt, designed to simplify recipes like biscuits. -
Can these biscuits be made ahead of time?
Yes, you can prepare the dough in advance and store it in the refrigerator for up to 24 hours, or freeze the baked biscuits for later enjoyment. -
What substitutions can I use?
Dairy and flour substitutions are easy—use alternatives like coconut oil for butter, milk mixed with vinegar for buttermilk, and create your own self rising flour using all-purpose flour, baking powder, and salt. -
How do I maintain the perfect texture?
The secret lies in using cold ingredients and minimal mixing to avoid tough biscuits. -
Can I add extra flavors?
Absolutely, add herbs, cheeses, or spices to personalize your biscuits.
Final Call to Action
I invite you to embrace your inner baker and give this recipe a try. Whether you’re looking for a quick breakfast treat or a versatile side for dinner, these homemade buttermilk biscuits are sure to impress. Don’t forget to share your results, tips, and creative variations in the comments below or on social media. Let’s build a community of passionate cooks who love experimenting in the kitchen!
Happy baking, and remember: every great recipe starts with a little bit of curiosity and a lot of heart. Enjoy your journey in the kitchen, and let these biscuits remind you of the simple joys that food can bring.
For more inspiring recipes and cooking tips, visit Activity Recipes. And if you’re ever curious about different ingredients or need more ideas, I highly recommend checking out Serious Eats for expert advice and insights.
Feel free to bookmark this page for future reference and share it with your fellow food enthusiasts. I can’t wait to read your feedback and see how you’ve made these biscuits your own. Happy cooking!